Tutorial
Deploying a Kubernetes cluster using Infrastructure Manager.
In
this section, you will learn how to deploy Kubernetes using
Infrastructure Manager. Follow along with the video and / or follow the
instructions in the documentation.
Before you start:
You will need an organisational user account, academic or social, to be enrolled in our access login system: https://aai.egi.eu
You will need to become a member of one of the EOSC-Synergy Supported VOs.
For instructions on how to join VOs see: http://infra.eosc-synergy.eu/vos/
The first step is to login into the IM using your organisational user account. Navigate to the Infrastructure Manager Dashboard at https://appsgrycap.i3m.upv.es:31443/im-dashboard/login or click here. You should be redirected to the IM Dashboard main page:
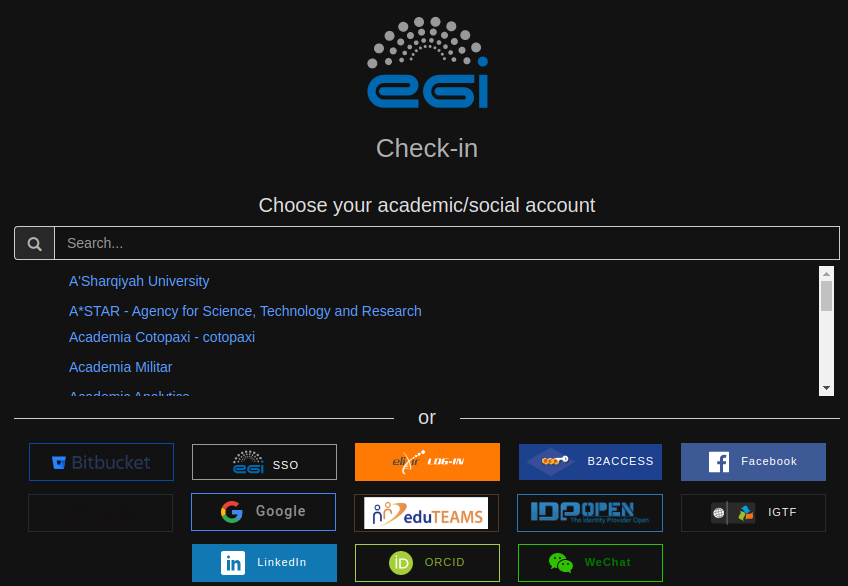
Now, click on “Login with EGI Check-in” to start the authentication procedure. Authentication in the IM service provided by the EOSC community is performed through OpenID Connect (OIDC).
OpenID Connect is a simple identity layer on top of the OAuth 2.0 protocol. It allows Clients to verify the identity of the End-User based on the authentication performed by an Authorization Server. OpenID Connect allows clients of all types, including Web-based, mobile, and JavaScript clients, to request and receive information about authenticated sessions and end-users.
You can find out more information about OIDC on the official web page at openid.net. Note, this technology details are not in the scope of this course.
As mentioned, after click on the “Login” button, you will be redirected to an interface where to select the institution you would like to use to identify yourself:
Follow
the procedure steps indicated by the authentication process and you
will be finally redirected back to the IM Dashboard now with your user
session active.
Set your cloud credentials.
(Note, this step is only needed if your are part of more than one project/VO in the specific site)
At this moment in the tutorial you should find yourself at the IM Dashboard catalogue selection page:

Here
you should be able to see all the infrastructure templates available to
deploy on your organization. However, as a user, you might belong to
more than one project or Virtual Organizations (VO). If that is the
case, first of all you need to indicate to the IM to which VO you want
to link your infrastructures at each site. To do so, you have to click
on the “Cloud Credentials” index on the menu displayed after you click
under your user name at the top right:

Afterwards, you will be redirected to the credentials management page:
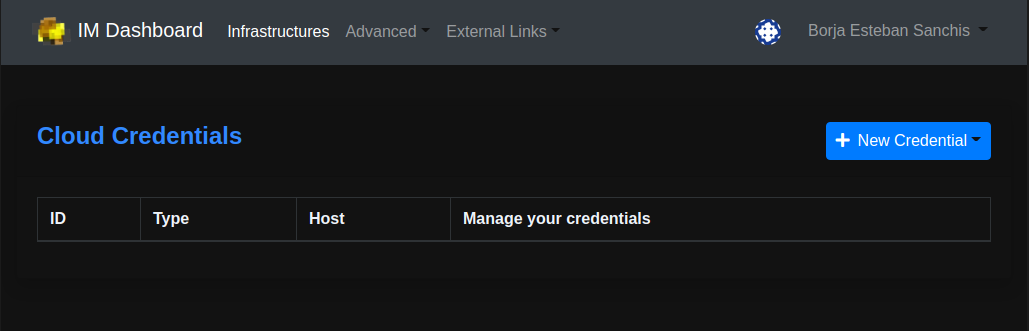
For the moment, as this is our
first visit to the IM, probably you do not have any credentials
configured. So the first step is to add your credentials. To do so,
click on the button “New Credential” and select the “EGI icon”.
You will be prompted with a pop-up window where to select the “EGI credential” attributes:
Id: Short identifier to provide to your credentials;
For example “CETA-GRID-Credentials”
Select VO: Virtual organization to link to an infrastructure provider.
For example “o3as.data.kit.edu” for Ozone assessment project.
Select provider: Identification of the provider where to deploy your infrastructure.
For example “CETA-GRID” for the Centro Extremeño de Tecnologías Avanzadas.
After introducing the details, click on the “Add” button so it is saved into your profile:
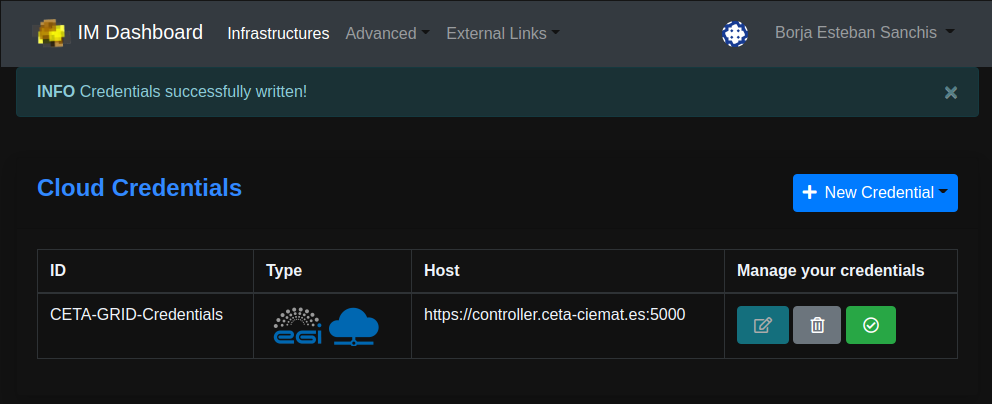
You can “Edit”, “Delete” and “Disable/Enable” each credential by using the buttons available at the column “Manage your credentials” at each row. Now we have configured some credentials, we can go back to the main catalogue page to select the infrastructure to deploy. To do so, cich on the “IM Dashboard” on the top bar menu.
Deploy your kubernetes cluster using the IM Catalogue.
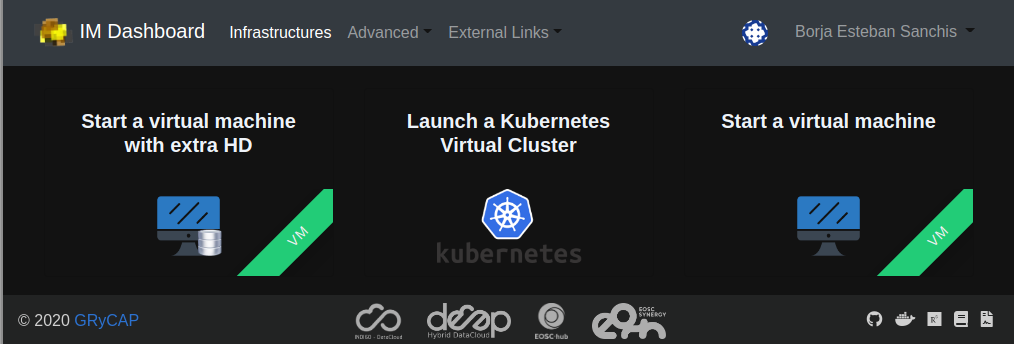
From the IM catalogue page, you should be able to see all the infrastructure templates available to deploy on your infrastructure provider. In this section of the tutorial, we are going to configure and launch a kubernetes virtual cluster. To do so, scroll down until you find a template icon with the name “Launch a Kubernetes Virtual Cluster”.
Move your mouse over the template and click under the appearing button “Configure”. You will be redirected to the TOSCA template configuration:
From this point, you have to complete 3 forms:
-
Hardware Data: Information about size and hardware for your cluster.
-
Kubernetes Data: Specific kubernetes configuration for your cluster.
-
Cloud Provider Selection: Where you want to deploy your cluster.
The
following figures show an example about how to deploy a cluster
example. Try to follow them and modify the fields you consider
appropriate for your application/example.
Hardware Data.
The first tab on the page requests the details about the size of your cluster. Note those resources will be spawn at the selected cloud provider at one of the next steps.
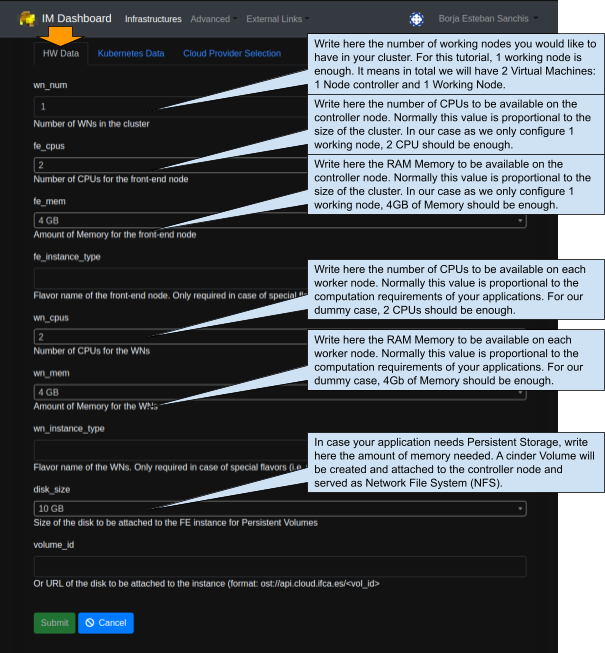
Note the “Submit” button is disabled as we still need to fill the rest of the template tabs.
Kubernetes Data.
The next tab requires the information about the kubernetes software to run on the cluster. For example the kubernetes version to run or the plug-ins and extensions you would like to install.
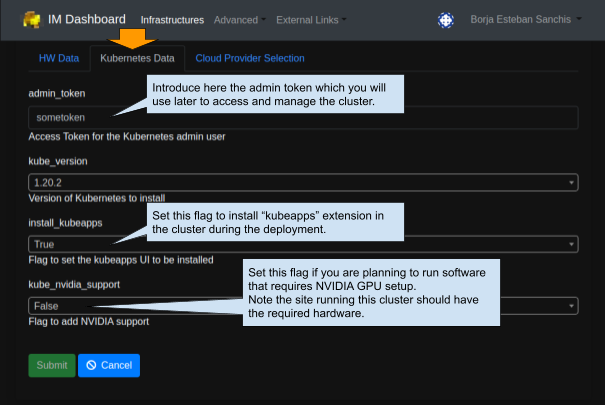
Note the kubernetes version at the development of this tutorial was “1.20.2” but a newest version can be selected or appear as default as the kubernetes community develops new releases.
Also
some fields might change depending on the TOSCA template you have
selected. As the Infrastructure Manager continues its development adding
more features and TOSCA templates, the Kubernetes Data figure might
look quite different.
Cloud Provider Selection.
As the last step, navigate to the last tab “Cloud Provider Selection” and open the selection list for the “Cloud provider”. You should see a list of all available “Cloud credentials” listed at Set your cloud credentials. Then after a few seconds the list of “AppDB” and “Site” images should be updated so you can select the underlying OS running your cluster.
In addition, you might see some pie charts updating. These charts display the resources available for the configured VO and Cloud provider, for more details about the chart values move the mouse over the desired resource. Note that for a successful deployment, the hardware requirements defined at “HW Data” must fit with the available resources at the Cloud Provider for your Virtual Organisation.
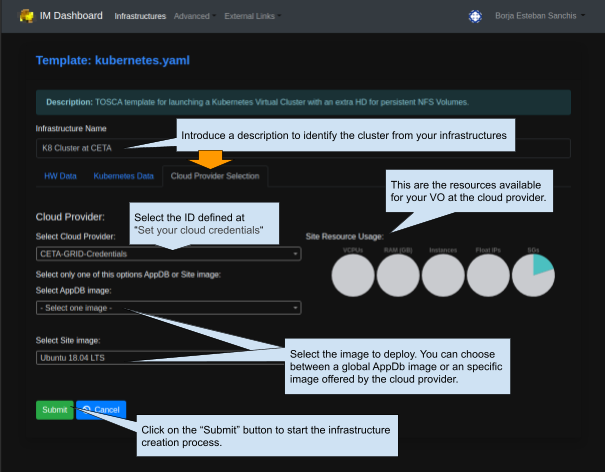
Do
not forget to provide a “Infrastructure Name” so you can identify it
later when listing all your infrastructures. If all the requirements are
fulfilled, then you should be able to click on the “Submit” button to
start the deployment of the Kubernetes cluster.
Access your kubernetes cluster.
Once the tosca template has been submitted, the deployment process starts. You will be redirected to “My infrastructures” page and see a new row with the Name just defined.
The field “Status” shows the current status of the deployment and can take the following values:
Pending: Your infrastructure is in queue for deployment.
Running: Your infrastructure is currently being deployed and configured.
Configured: Your infrastructure is ready and available.
Failed: Your infrastructure could not be deployed. See How to access your infrastructure deployment logs.
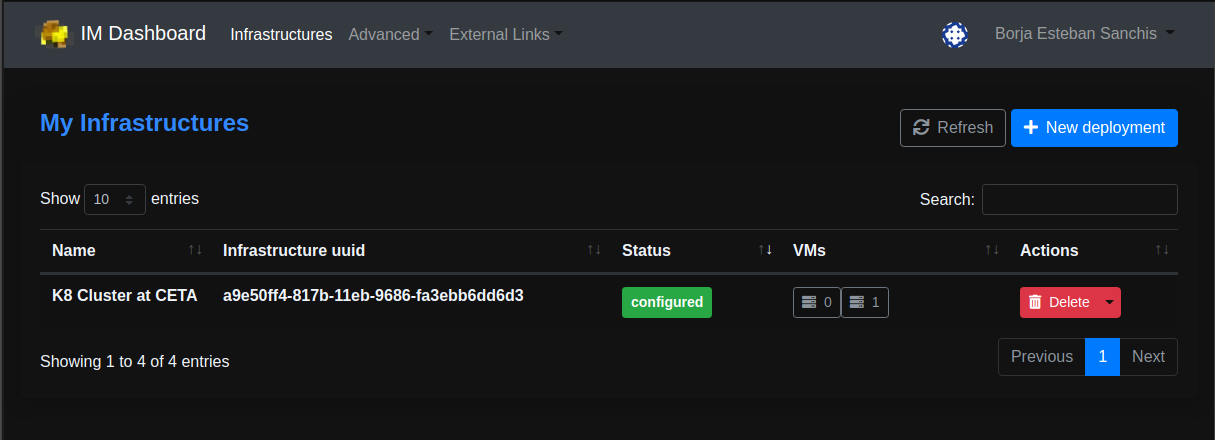
Once
the deployment is finished and the status of the infrastructure is
“Configured”, click under the low arrow button near “Delete” (But be
careful not to press “Delete”) and it will display a list of actions to
perform. Select “Outputs” to be redirected to the “Outputs” page:
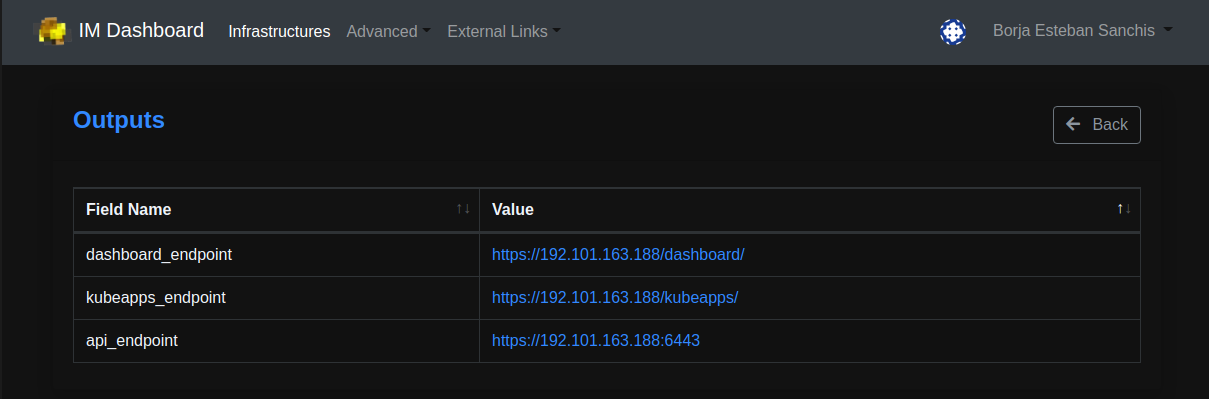
In this page you will find the links needed to manage your cluster:
Dashboard_endpoint: Link to the kubernetes management dashboard.
Kubeapps_endpoint: Link to the extension “kubeapps” for the cluster.
Api_endpoint: Kubernetes management API endpoint. See this The Kubernetes API guide to learn more about how to manage a kubernetes cluster.
To log in as administrator at the endpoints, use the admin token defined at Kubernetes Data.
Manage your kubernetes infrastructure.
In this section, you will learn how to manage your Kubernetes cluster using the Infrastructure Manager. Follow along with the video and / or the instructions in the documentation.
Before you start:
You will need an already deployed kubernetes cluster. If you do not have one yet, go to Deploying a Kubernetes cluster using Infrastructure Manager to learn how to deploy one.
You will need to become a member of one of the EOSC-Synergy Supported VOs and have access to the Infrastructure Manager. For more details check Login with EGI Check-in.
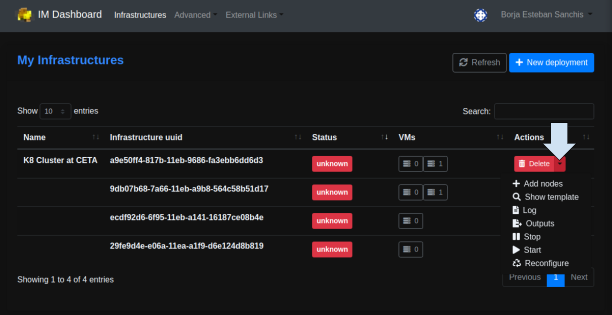
How to delete an infrastructure.
All your infrastructures should be listed at the “infrastructures” menu of the Infrastructure Manager. To delete an infrastructure just click on the “Delete” button under the “Actions” column.
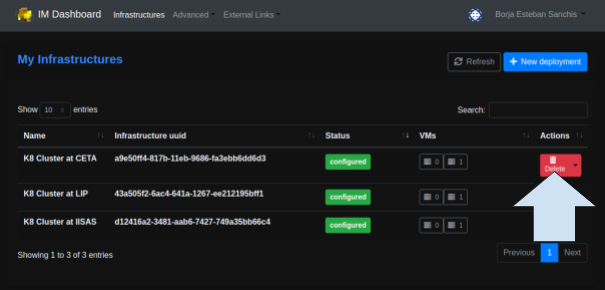
A pop-up window should appear requesting confirmation for the infrastructure deletion. To confirm, click on the “Delete” button.
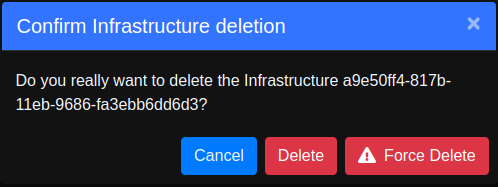
Note
there is a special option “Force Delete”. This button only deletes from
the infrastructure manager but NOT from the cloud provider. This option
should only be used in special cases and it is highly recommended to
confirm and remove the real infrastructure at your cloud provider using
their user interface or contact support.
How to access your infrastructure deployment logs.
In case your infrastructure was not correctly deployed, you will see the Status “Failed” or “Unknown” under the column Status at your infrastructures menu. You can access a deployment log information under the “Actions” column by clicking on the “Log” button after deploying the contextual menu under the small “low arrow” next to the “Delete” button.
Note
this menu also offers the option to display the TOSCA template used for
the deployment under the option “Show template”. This might help you
and your cloud provider to determine the root cause of the failure using
the details of the deployment request.
How to add nodes to your infrastructure.
You can add more nodes to deployment using the action “Add nodes”, see figure from How to access your infrastructure deployment logs.
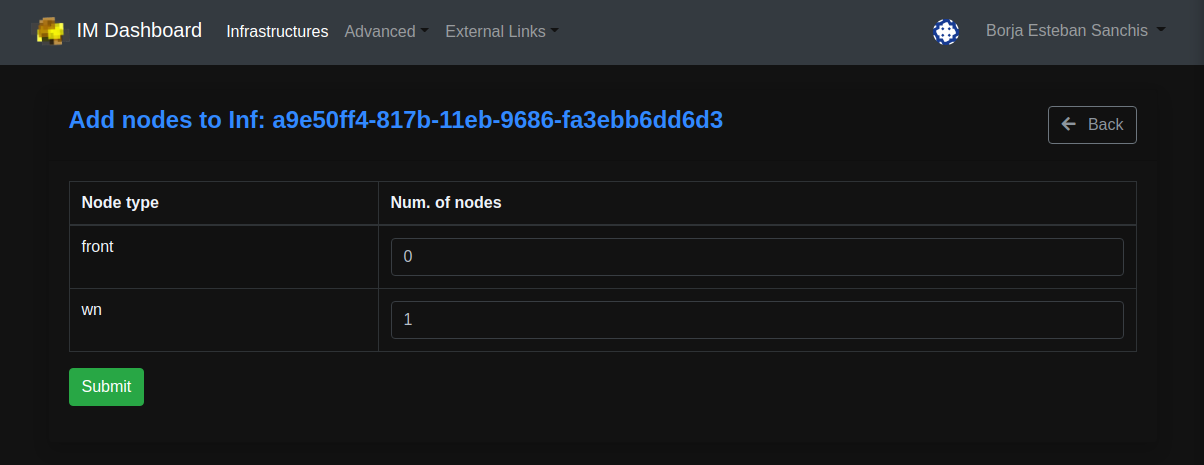
Introduce the number of nodes to add as controllers (front) and workers (wn) and click on the “Submit” button.
How to access your infrastructure virtual machines.
So far we have seen how to access the kubernetes cluster, but what if we need to connect to the OS of one of our virtual machines but not the cluster itself. When deploying a cluster, multiple “server” icons should appear under the column “VMs”.

Every icon represents one of your virtual machines on the cluster. You can click on them to access their specific information.
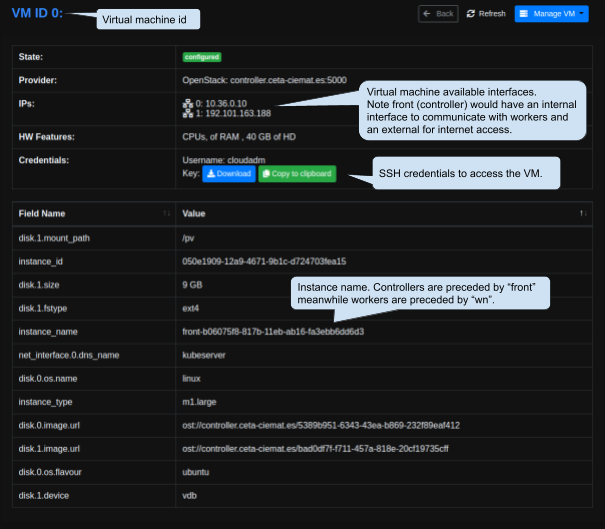
Here we can see all the details of the controller node. To access the virtual machine we need to download the private key using the “Download” button and use it on our ssh connection together with the indicated username and interface IP: `ssh -i key.pem cloudadm@192.101.163.188`.
Note ssh private keys need specific permissions, remember to set `chmod 600 key.pem`.
The IP would be different according to your cloud provider. If the node you want to access do not have a public IP you need to perform a previous ssh into a “front” machine.